Statement of Intent
My objective for this project is to satisfactorily form a set of images that stand by the unique methods I will be using based around professional photographers such as Magdiel Lopez, at the end of my project I will choose my best photos to go into a gallery and explain my journey and way on how I achieved this final goal.
My initial research was finding a photographer as an inspiration for this topic, they would have needed to be high level. My Aim in this project is to successfully create a series of images that represent the different methods I will use that are based around photographers such as Magdiel Lopez. At the end of the project I will pick my best images to go into a series and also display my worst image and the process to get to the best image.
My initial research was finding a main inspiration for my portraits and a photographer that is creative and will be a high level to achieve as I am passionate about photography and would like to achieve the best grade possible. Therefore I will pick a challenge as inspiration so that I strive to achieve it. I have specifically chose Magdiel Lopez as her portraits are lively and filled with colour and slightly difficult to achieve therefore it will leave me with a struggle and challenge so I can have a further in-depth understanding of my journey and how my final outcomes got to such a place.
I chose my themes of photography to completely show what I am capable of and to use methods that I might not use if it wasn't for this project which therefore could further deepen my knowledge and understanding in photography which will make my skill gap a lot higher. I will show my progress and journey by portraying how I took each image and the process it took to get to that stage including the use of my photoshop and photo manipulation. These will be shown in chronological order for better understanding and a clearer journey. I will experiment by using a variety of different settings on the cameras given by changing white balance, ISO, composition and aperture on the settings menu which can change my outcomes and final images.
Magdiel Lopez Mood Board
I have chosen Magdiel Lopez because he has a unique choice of work as the vibrant colours stand out, he usually uses the colours; blue, pink and red. The impact these colours have is that it makes the people stand out. This might inspire me to do the same with my work as I like Magdiel's style of work.


Background
I have chosen these images as it pays attention to Magdiel's background and the colour's he uses in his pictures. It also creates a new "world" when you see it as it drifts you mind into the colour's. This can inspire me to have a similar work style when I do my backgrounds.


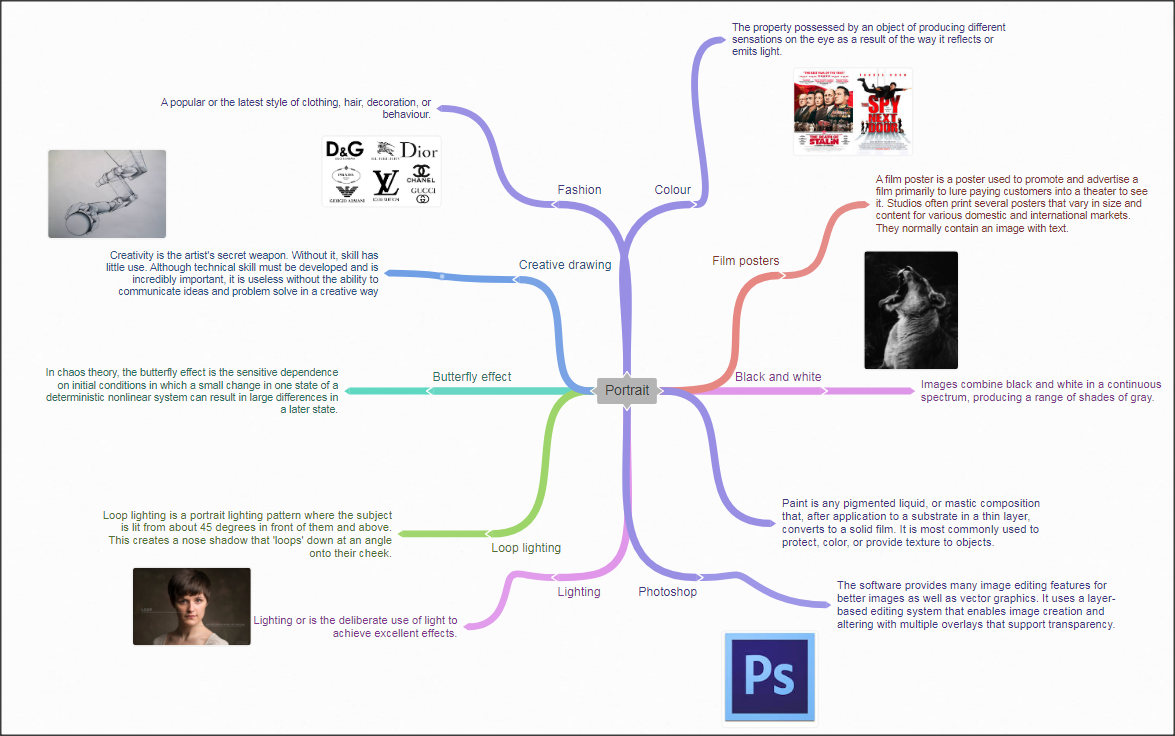
Mind map to show my first research ideas
“Photography takes an instant out of time, altering life by holding it still.”
Photography Research - Using The 5 C's
Composition
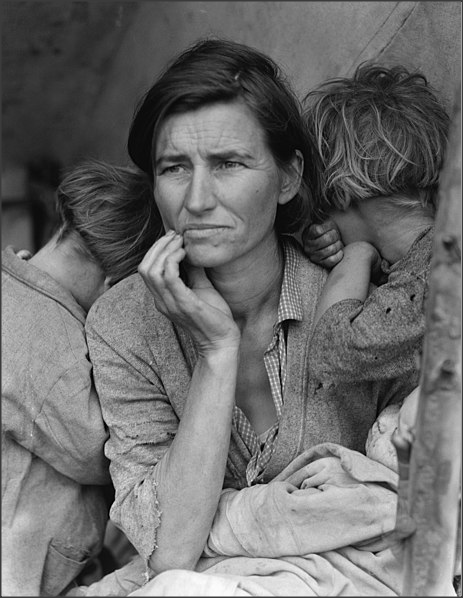
I believe the woman is giving off a concerning/struggling mood for the photo, the black and white theme also adds on to this to give a gloomy, dark effect. The 2 kids give the effect of Rule Of Thirds by sleeping on each side of the mother showing how exhausted they are. When this photo was taken it wasn't a digital camera it was a film camera which is why it is in black and white. The mothers' eye is the sweet spot as she looks directly where we first draw our eyes towards. The shape they are all aligned in creates a triangle which shows they stuck together like a triangle does even after all they went through. Someone who sees this image tends to feel sympathy for her and her kids as the image shows what struggles they had to go through. The background is blurred which means they have used a low Depth of Field to show how they are possibly lost or confused on where they are as they have had to flee.
Context
This photograph was taken by Dorothea Lange she was an American documentary who used to take studio portraits however she took a job as a photographer for the Resettlement Administration. Her portraits displaced farmers during the Great Depression, greatly influenced later documentary and journalistic photography. Lange one day found herself in Nipomo, California, at a campsite full of out-of-work pea pickers. The crop had been destroyed by freezing rain; there was nothing to pick.
Content
There is a triangle type structure in the image to show they stuck together at all time no matter the difficulty. The image is an old picture, which could possibly mean the black and white wasn't a filter, but it was reality. The pictures were taken in Nipomo, California. There is nothing we can see in the background as it blurred out.
Connection
The theme is gloomy, dark and sympathetic so the theme is not relevant to my project as Magidel Lopez (My chosen photographer) has a bright, joyful theme. This image does not link to my work as it was taken to be a dark picture and Lopez has a different theme. The message behind this image is that it shows a mother and her 2 children struggling, possibly starved. The black and white effect gives the mood of struggle and remorse. It is a black and white theme to show the dark mood and would not work with my project as my project requires colour.
Comment
The one thing I like about the image is that it gives off so much effect and power and makes us feel remorse as we can see right through the image right to her struggle, the aperture has been used correctly and the black and white has been used right too. I do not like that we can't see the background of the image due to blurriness as we cannot interpret further about the place she is in. Unfortunately, this image has no link to my project so it will not inspire me to use this in my work. The message behind this image is that it shows a mother and her 2 children struggling.
Mock Exam
Content:
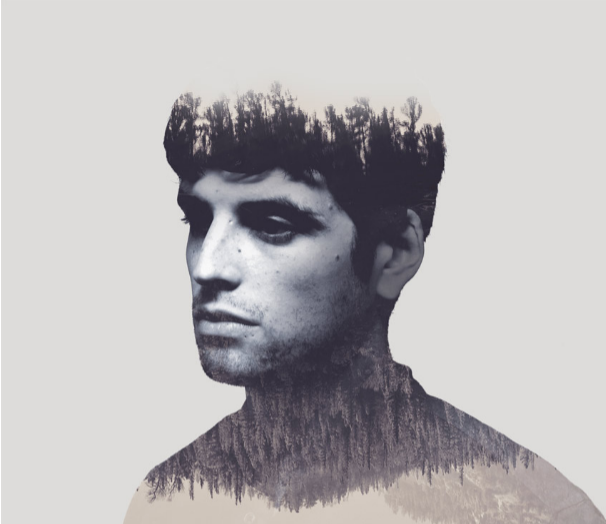
In this image you can see the figure and the outline of what seems to be a man. There happens to be some sort of filter, most likely black and white due to the dull colour in the skin, then apart from his face, the top half of his hair and from his neck to shoulders. There is trees everywhere, like a forest. Although this has obviously been photoshopped and is not a natural image, I believe the outcome is perfect and really effective as the trees give off a unique feature.
Composition:
There is a slight change in distance as you can see the trees on the neck-shoulder region starts to stretch out as far as it can, however since the image as a whole was just taken with a man and a plain background, you don't really have a foreground/middleground distance. The strong leading lines are very bold, as you can see they outline his face and body, which draws attention to the trees within the person in the image. As said previously due to the image being so close up, the rule of thirds would not really come into effect here, the face is directly in the centre however I believe that was done intentionally as it works well, also both shoulder "tips" are on the rule of thirds in a way so that leaves a slight impact on the image and sweet spot. The picture of the man was clearly taken at eye-
level, most definitely on a tripod in a professional studio. But as you can see there is multiple things to talk about, the bottom set of trees look as though it was taken by a drone or some sort of flying object with a camera as it is so high up, it captures majority of the trees and the broad background. I personally believe the F-Stop they used was from around 8-15 as the border behind the man is blurred out and very clean in a way, yet his face and body doesn't blur whatsoever. The F-Stop 16-20 was most likely used in the top set of trees in the mans hair, and the F-Stop 32 I believe was used in the bottom set of trees. I can only assume the ISO was set to either 100 or 200, however due to the photo being black and white it becomes hard to tell. Same goes for the white balance, they must've used cloudy for the trees and shade for the man however as it is black and white it is very hard to tell. I actually believe it is slightly underexposed due to his eyes being really darkened and hard to see, although that may have been done for effect I personally do not like that part of the image, it would have been a lot better if they exposed it correctly near his eyes and perhaps given a sweet spot in the top left. Although I've already mentioned this above, I 100% believe the picture of the man was taken on a tripod along with the top set of trees, however the bottom trees must've been on a drone with a camera that would have had to stay still. It's very blatantly been manipulated in photoshop, as that is the entire purpose of the image, a variety of tools would have had to been used to create such an outcome as this image ranging from duplicating, the layers tool, filters, cropping etc. Also I believe the shoulders and actual outline was indeed manipulated too. As you can see around the ear
and back of the head, it is almost as though that line is TOO smooth to be true, the ear bends in an awkward way leaving me to believe that the entire face outline was photoshopped but that's what makes the photo so unique and perfect. As a filter has been put on you can just see black/grey and white. However as there is a lot of different things you may see in your imagination, you could probably recreate something in your mind making the image colourful and bringing it to life. There is no specific patterns however some may class the rigid structure at the top of the mans hair due to the trees as a pattern as it does look like one. Although the "cropping" of the image could have just
been originally taken like that, its possible that it was cropped from the bottom as there is that hard line near his chest. Already mentioned above many times however yes, there is an object, multiple actually which is both sets of trees in his hair/shoulders.
Connections:
I actually quite like this image a lot, the photoshop manipulation that would have had to take place is up to a high standard however it's very possible as I am capable of doing something like that, one of my previous photos involved cropping/fitting a landscape into a pair of glasses which was done very well, so I understand how she/he photoshopped the trees into the mans hair and shoulders. Although I am currently working on textures and this will most likely not be something I work on soon, it is very possible that I choose to do something like this in the future as I personally think it looks amazing.
STR: Amazing photography and photoshop skills, refines the image and gives off a really nice effect.
EBI: The darkness in the eyes is the only slight imperfection in the image as it makes it unclear what is happening in that area.
Inspiration:
Hopefully I do achieve this image after my current topic, I want my outcomes to look very similar if not identical to this image and the image will really help inspire my themes and photoshopping.
Content:
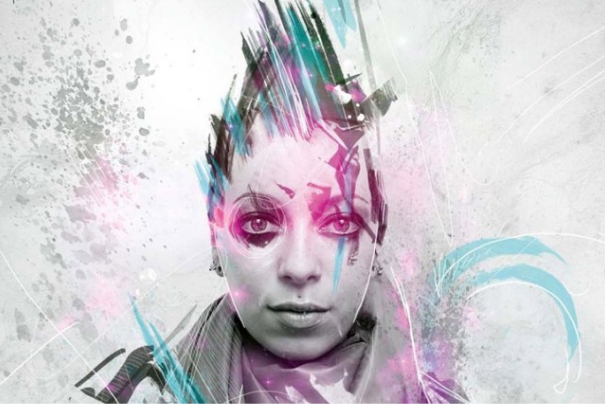
In this image as you can see a lot is going on, there is patterns, shapes and lights. The person in the image stares directly into our eyes and seems to "ignore" the wild effects in the back and on top of their head. This image has been manipulated via photoshop however it gives an amazing and really nice outcome.
Composition:
There is just a foreground, as the person is so close with just a plain background there is no middle-ground however it still leaves a great effect on the person. Although there are SOME leading lines, the whole image is a bit random and messy so you cannot really see them as well as any other image. Rule of thirds was not used in this image, rather they put the model/person in the centre of the image facing directly towards the camera at eye-level. This photo would have been taken on a tripod in a professional studio aswell. But as you can see there is many things to talk about, the bottom of the image is dull and has very little to talk about. However as you go up you gradually start to see more and more happening in the image, it becomes flustered with shapes and patterns. I personally believe the F-Stop they used was from around 8-15 as the border behind the person is blurred out and very clean in a way, yet their face and body doesn't blur out. Similarly to the first image I talked about, the ISO was set to either 100 or 200, however due to the photo being black and white it becomes hard to tell. Same goes for the white balance, they must've used the white balance "Shade". I believe it is exposed correctly, everything is lightened and visible clearly. Although I've already mentioned this above, I 100% believe the picture of the person was taken on a tripod. This image has very clearly been manipulated in photoshop, as that is the entire purpose of the image, many tools
would have had to been used to create such an outcome as this image ranging from the layers tool, filters, cropping, adding shapes, colour, etc. As a filter has been put on you can just see black/grey and white. However as there is a lot of different things within the image that has colour, the spikes and blades which are shapes act as the "hair" for this person in a way. There is many different shapes and patterns which act as the models' hair. Although the "cropping" of the image could have just been originally taken like that, its possible that it was cropped from the bottom as there is that hard line near his chest. There is no particular object in the image apart from the blades and "hair".
Connections:
I actually quite like this image a lot, the photoshop manipulation that would have had to take place is also up to a high standard however it's very possible as I am capable of doing something like that, one of my previous photos involved something very similar to this, so I understand how she/he photoshopped the spikes and shapes/blades into the hair. Although I am currently working on textures and this will most likely not be something I work on soon, it is very possible that I choose to do something like this in the future as I personally think it looks amazing.
STR: Amazing photography and photoshop skills, adding hair onto the model via photoshop was a great idea. The image and gives off a really nice effect.
EBI: I believe the person manipulating the photo could have added a little more amongst the lower half however who's to say it wasn't meant to be like that.
Inspiration:
Overall I really do like this image, apart from the fact that it seems fairly difficult to recreate, I hope to do something like this for my topic in the future.
Planning my first photography shoot for my portrait project


|
I am starting my first photography shoot by taking inspiration from the famous photographer, Magdiel Lopez. Magdiel Lopez focuses on Photoshop along with different colours and patterns. He uses the Photoshop on the models to show his creativity through them. I really like the way he has "wacky" and "fun" patterns in his photos which give a interstellar - like feel. I intend to do the same with my models the way he does by editing them with "wacky" objects and experiment by adding different backgrounds, patterns and more.
The equipment I will be using is a canon DSLR with a lighting studio, it will also need a plain white background for me to edit on. I will also use a tripod for perfection as the picture will be completely still and not blurred, as I am not going for the blur effect. In the lighting studio I will use the lights at an angle towards my model (Yusaf Dukahli) to give the effect that the light is coming from one direction. There will also be an infinity curve on the background to give it that finishing touch. My model is going to be Yusaf Dukahli as they have the correct profile I am looking for, I will only be taking a picture of his face so he can wear any clothes he wills to, I will also ask him to wear his glasses as I can edit them to make them look "wacky" I will also make him spike his hair up to give me more to edit on. My model is available in school as he is in my lesson, so I will need to find a location to black out where no sunlight comes in so that I can turn on my studio lights, this will help my images look much nicer and clean. Due to Magdiel's work style, which is what I was inspired by, I will also not be using any props as it will ruin the effect, however, I will need the model to have a chair for comfort. I intend to take at least 20 images, every 5 images I will change background and also change the position of my model or the angle of the camera to give a different feel every time. It will also give me a variety of images to choose from and select. |


Lighting effects

|
I will try and use a mirror for effect as when reflected on with the right lighting it gives a line of light which you can control for e.g:
|

As you can see the lighting with the mirror is used to create lines on the model for effect, I will try and recreate this effect in order to refine my work and have a good outcome, the mirror is used very well in order to give a sort of effect as if the model is underwater/swimming.
The images below is my first ever time experimenting with photo manipulation with photoshop, I learnt about the different settings and tools that could be used and tried my best to have a good looking outcome.


Best: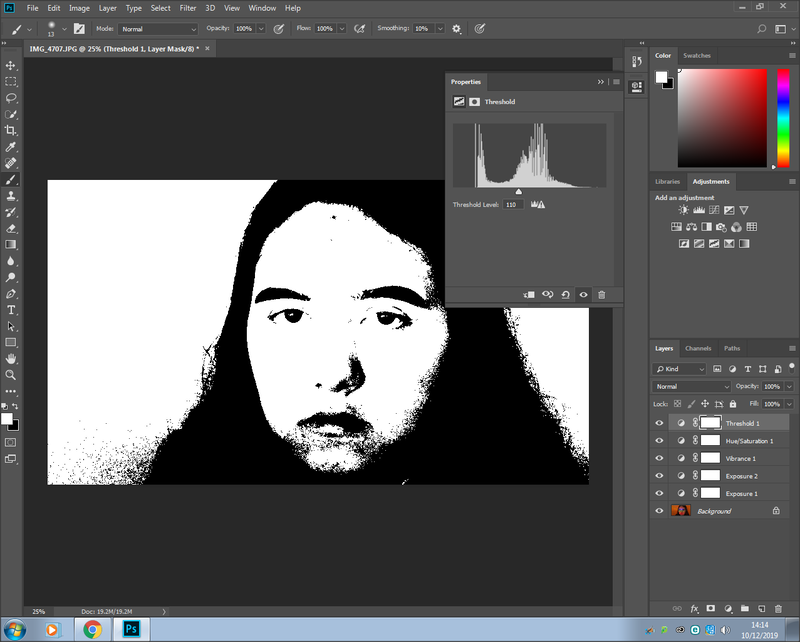
|
Worst: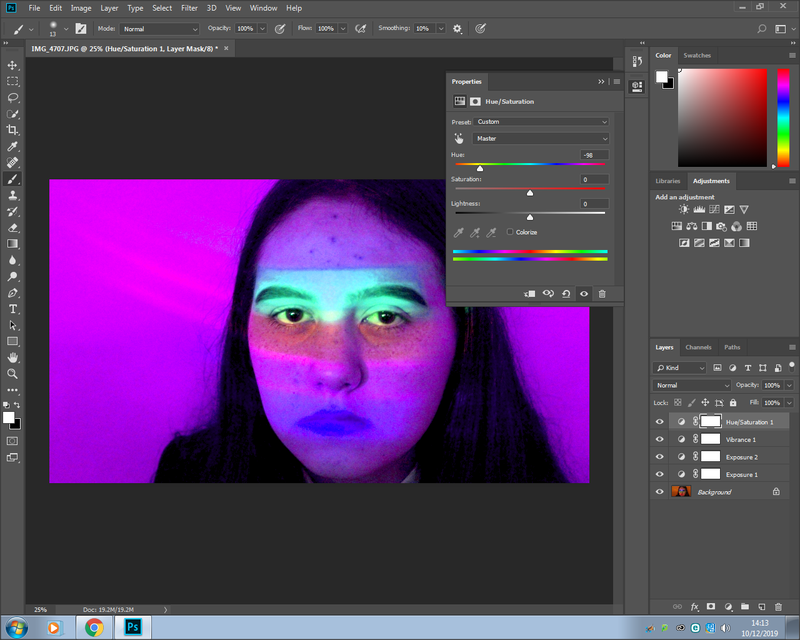
|
The image on the left is the best out of all of the rest in my opinion, this is because the black and white filter with the grainy effect gives off a really nice vintage effect, whereas the image on the right is a bit random and unorganised as I was testing my abilities via photoshop.
First Shoot:


Best:
The lighting in this image reflects off my models head perfectly and gives a good outcome.
|
Worst:
There was little amounts of lighting in this image therefore it was too dark.
|
Photoshop 1:


Second Shoot:


Best:
This image is the best because my model was posing correctly with his face shown in the right lighting.
|
Worst:
This image has my models shadow and he is covering parts of his face which makes this the worst image.
|
Photoshop 1:


Third Shoot:


Best: |
Worst: |

This photo is when my model was prepared, gave off a good expression and was facing right in the camera with good lighting.
|

This image was taken whilst my model was unprepared which makes it look messy and disorganized.
|
Photoshop 1:


Fourth Shoot:


Best:
This image shows the right angles of my model therefore giving me an easier time in photoshop.
|
Worst:
This photo was exposed to too much light and unfortunately blurred, also the model was not ready in this image which is why he has the blank expression.
|
Photoshop 1:


Photoshop 2:
Tutorial Used: https://www.youtube.com/watch?v=k_lgkcbCtQs


Photoshop 3:
Tutorial Used: https://www.youtube.com/watch?v=k_lgkcbCtQs


Photoshop 4:
Tutorial Inspiration (Did this from memory) :
https://www.youtube.com/watch?v=k_lgkcbCtQs


|
|
Photoshop 5:
Tutorial Inspiration (Did this from memory) :
https://www.youtube.com/watch?v=k_lgkcbCtQs


1. I have downloaded Snap seed as it is an amazing app to use on your phone, its quick and simple and easy to use, the filters and many different options there is, is amazing as it is a free app.
2. Yes, the site shows how to use different effects and filters, it is useful as it is simple to use and is easy for people who are new to using editing software's to access.
3. I mainly used black and white and a filter called "pop" as it went perfectly with my images and brought them to life. I will now refrain from using black and white and try to use more colorful filters.
4. Yes, the effect looks nice and I am happy with how it came out, I hope to make better images in the future. I will continue to refine my work and develop.
5. I'm going to try different filters, mess with the saturation, brightness etc, also stop using pop as I overused it.
Here's a website I used to help myself learn how to use Snap seed better.
https://www.youtube.com/watch?reload=9&v=CCOlVPLP9Xw&ab_channel=DeeNimmin
Gallery: (For snapseed)


Final Gallery


Evaluation:
1. What was the project theme and what did you think of it?
My project theme was portrait and I decided to base it upon Magdiel Lopez's style of work, seeing the way he Photoshopped inspired me as it was unique and I had never seen it anyway from anyone. I did many different things for portrait such as 5 C's and a mood board so I can imagine what my final project outcomes would look like.
2. What part of the project did you enjoy the most/found most interesting?
I found that Photoshopping the image was the most fun as it required time and effort, and right at the end when I got my final outcome, I had something to be proud of. I also found setting up the photo shoot was fun and we kept on getting faster and faster at it which reduced wastage of time and allowed us to collect more photos.
3. What new techniques have you experienced?
In this project I have advanced my photography/Photoshopping skills exceptionally well, I used the help of YouTube tutorials to get to the stage I am now, however I feel as though now I can edit photos without the help of tutorials and figure out new things by myself. Also I now know how to transfer photos from Gmail to my Google Site for my homework project.
4. What technique would you like to develop further?
The technique I would like to develop further is the "burn tool", I feel as though this tool can be used to create realistic images and shadow however I simply cannot perfect the use of the "burn tool". Also i would like to work on my filters as I never managed to master my filters on images either, which is one of the most basic and simple task, I never managed to get it down correctly.
5. Which photographers did you research throughout this project?
I researched Magdiel Lopez throughout my project as I was inspired by her and wanted my photos to be similar, she influenced my photos and made me Photoshop in such a way which made my final outcomes outstanding, I also went on her Instagram and took inspiration from there as she posted all her images on there.
6. How have they influenced you?
Magdiel Lopez influenced me when I saw her idiosyncratic Photoshopping skills, from then on I knew that my project had to be based upon her style of Photoshopping, I have now watched tutorials and further developed my skills so I believe I can edit my images similar to Magdiel. I will be choosing a new Photographer so I can have multiple people to choose from.
7. Which technique did you enjoy the most?
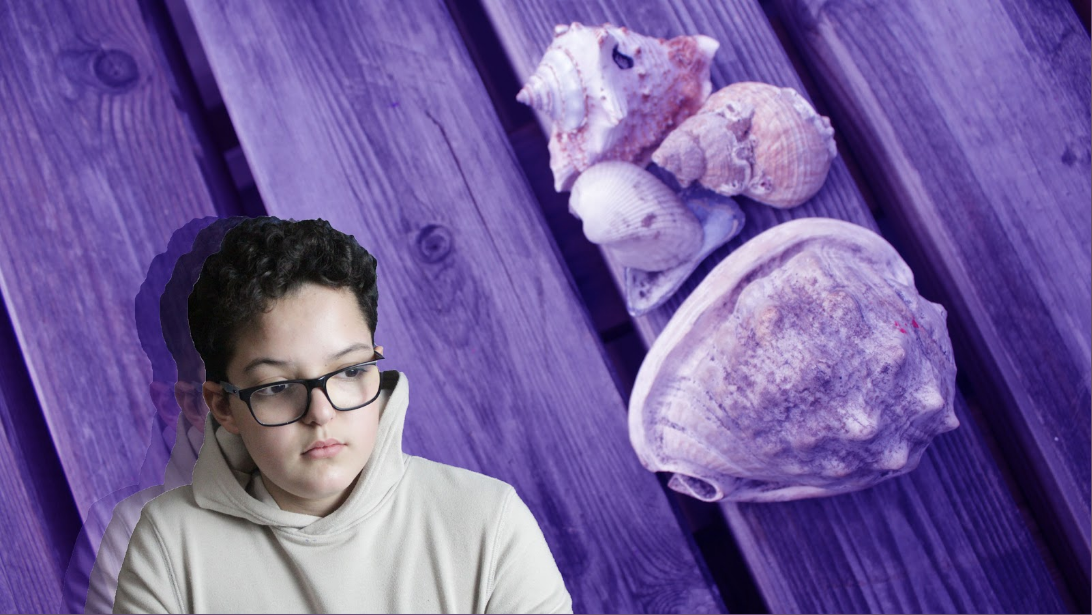
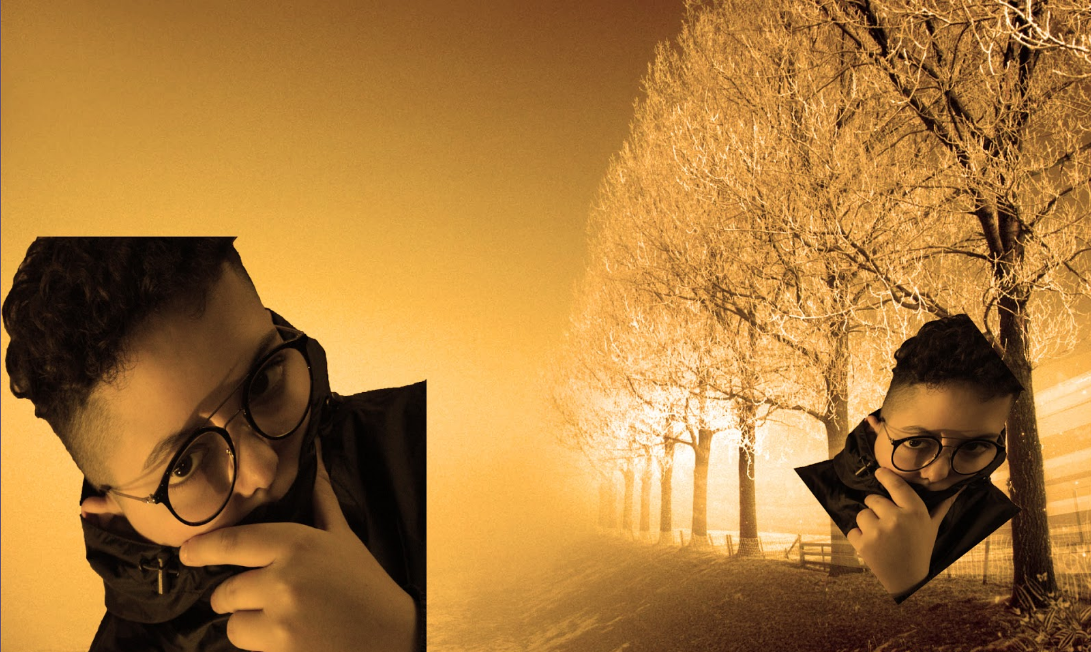
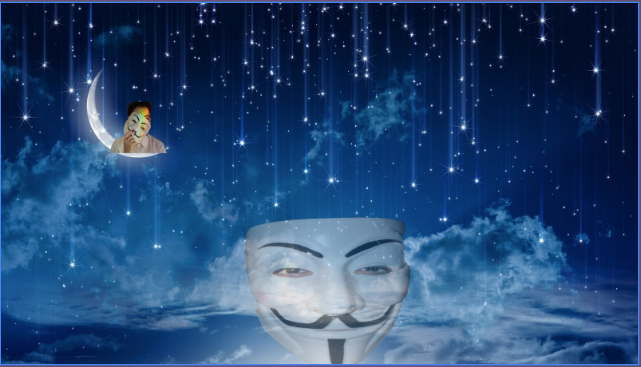
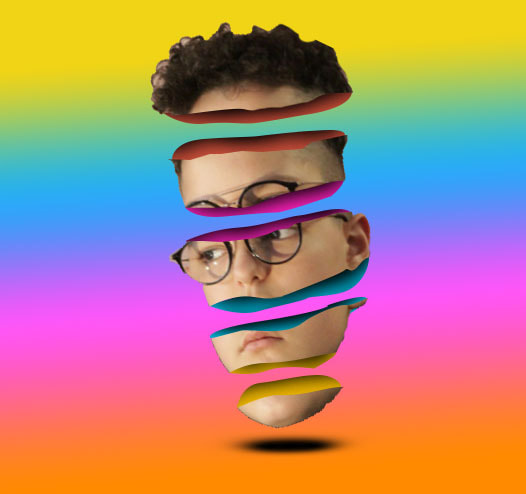
I enjoyed using the magic wand to remove any backgrounds or objects from my model's face, this tool was in fact satisfying which made me enjoy it the most. I also liked using the colour lasso tool as it helped me in the project where my model was split in 5 pieces, with this tool all I had to do was draw a circle and it made a realistic 3D type colour.
8. What do you feel is the most successful part of your project and why?
The most successful part of my project is the Photoshop I've done recently of my model's face in 5 pieces, I believe this is my best piece as I added shadow which gave a realistic effect and perfected my work as much as I could on that image. I spent a full double lesson editing that and it had around 20 layers.
9. Did you encounter any problems in the project?
The only problem I encountered was my Google Sites page (which I used throughout lock down as Weebly was down) sometimes acted up making it hard to resize images or add images onto the page. They didn't effect my final image thankfully as the problem was with the website, it only effected my time due to it taking 2-3 minutes just to resize an image.
10. How did you learn from them and did they effect your final outcome?
They didn't effect my final image thankfully as the problem was with the website, it only effected my time due to it taking 2-3 minutes just to resize an image. Also when I added colour to my model on the split in 5 pieces image, the colour came out with an error as if there was something on it even though I used the eye dropper to get the exact colour I wanted.
11. What would you do differently given the chance to complete the project again?
I will not experiment on Photoshop as much and get to working my final images and perfecting them, as in this project I only managed to get 5 final outcomes. I believe this will help my final outcomes become more clear and refined as I would have more time to edit and spend time on them.
My project theme was portrait and I decided to base it upon Magdiel Lopez's style of work, seeing the way he Photoshopped inspired me as it was unique and I had never seen it anyway from anyone. I did many different things for portrait such as 5 C's and a mood board so I can imagine what my final project outcomes would look like.
2. What part of the project did you enjoy the most/found most interesting?
I found that Photoshopping the image was the most fun as it required time and effort, and right at the end when I got my final outcome, I had something to be proud of. I also found setting up the photo shoot was fun and we kept on getting faster and faster at it which reduced wastage of time and allowed us to collect more photos.
3. What new techniques have you experienced?
In this project I have advanced my photography/Photoshopping skills exceptionally well, I used the help of YouTube tutorials to get to the stage I am now, however I feel as though now I can edit photos without the help of tutorials and figure out new things by myself. Also I now know how to transfer photos from Gmail to my Google Site for my homework project.
4. What technique would you like to develop further?
The technique I would like to develop further is the "burn tool", I feel as though this tool can be used to create realistic images and shadow however I simply cannot perfect the use of the "burn tool". Also i would like to work on my filters as I never managed to master my filters on images either, which is one of the most basic and simple task, I never managed to get it down correctly.
5. Which photographers did you research throughout this project?
I researched Magdiel Lopez throughout my project as I was inspired by her and wanted my photos to be similar, she influenced my photos and made me Photoshop in such a way which made my final outcomes outstanding, I also went on her Instagram and took inspiration from there as she posted all her images on there.
6. How have they influenced you?
Magdiel Lopez influenced me when I saw her idiosyncratic Photoshopping skills, from then on I knew that my project had to be based upon her style of Photoshopping, I have now watched tutorials and further developed my skills so I believe I can edit my images similar to Magdiel. I will be choosing a new Photographer so I can have multiple people to choose from.
7. Which technique did you enjoy the most?
I enjoyed using the magic wand to remove any backgrounds or objects from my model's face, this tool was in fact satisfying which made me enjoy it the most. I also liked using the colour lasso tool as it helped me in the project where my model was split in 5 pieces, with this tool all I had to do was draw a circle and it made a realistic 3D type colour.
8. What do you feel is the most successful part of your project and why?
The most successful part of my project is the Photoshop I've done recently of my model's face in 5 pieces, I believe this is my best piece as I added shadow which gave a realistic effect and perfected my work as much as I could on that image. I spent a full double lesson editing that and it had around 20 layers.
9. Did you encounter any problems in the project?
The only problem I encountered was my Google Sites page (which I used throughout lock down as Weebly was down) sometimes acted up making it hard to resize images or add images onto the page. They didn't effect my final image thankfully as the problem was with the website, it only effected my time due to it taking 2-3 minutes just to resize an image.
10. How did you learn from them and did they effect your final outcome?
They didn't effect my final image thankfully as the problem was with the website, it only effected my time due to it taking 2-3 minutes just to resize an image. Also when I added colour to my model on the split in 5 pieces image, the colour came out with an error as if there was something on it even though I used the eye dropper to get the exact colour I wanted.
11. What would you do differently given the chance to complete the project again?
I will not experiment on Photoshop as much and get to working my final images and perfecting them, as in this project I only managed to get 5 final outcomes. I believe this will help my final outcomes become more clear and refined as I would have more time to edit and spend time on them.
